451 reads
The Hunt for Data: Creating a Computer Vision Dataset for Road Safety
by Valdis GerasymiakMarch 3rd, 2023


Too Long; Didn't Read
The device was planned to be set with an advanced computer vision algorithm that can detect potential dangers on the road for cyclists. If the software detects danger, the device emits a flashing light to grab the attention of drivers. The safety system emits a loud sound to the vehicle behind before a collision, helping to prevent it.

In this article, I would like to share my own experience of developing a smart camera for cyclists with an advanced computer vision algorithm to detect potential dangers on the road and prevent collisions. I briefly described the whole process of prototyping and video data collecting from scratch below. It might be interesting both for Embedded and Machine Learning engineers. A little spoiler before we get started: the collected dataset later was open-sourced.
Table of Contents
- From Personal Experience: Road Safety Issues for Cyclists
- Open Datasets from Rear-view Cameras: Essential for Research, but Scarce Online
- Let’s Talk Hardware: Rapid Prototyping with a Low Budget
- Software Insides: Under the Hood of OTA
From Personal Experience: Road Safety Issue for Cyclists
I'm an avid cyclist with 30 years of experience, 20 of them on public roads. Once I got into a traffic accident on the road: a car ran over my bike from the side. Fortunately, I escaped with a slight bruise and sprain. So, I especially understand the safety problems that cyclists on public roads.
One of the solutions for the issue is to use bike cameras for capturing incidents. Cycling on the road, as we know, becomes safer when equipped with a camera that captures your viewpoint. In an altercation with a driver, having footage can serve as an additional protective layer. Without evidence, an unethical driver may deny responsibility, but having a camera for cyclists can serve as a lifesaver in such a situation. In the UK, there's even a website called Nextbase that facilitates the submission of action camera footage to the police, streamlining the process and reducing complications.
In other words, you can catch the accident on camera, but you must admit, it's always better to avoid a dangerous situation. When I started the project there were no proactive solutions for preventing dangerous situations on roads. So I decided to create my smart bicycle backlight with a camera. The mission of the project was to decrease death and injuries among cyclists.


Originally, the device was planned to be set with an advanced computer vision algorithm, often referred to as "artificial intelligence" in the media, that can detect potential dangers on the road for cyclists. Let me explain the concept in simple words: if the software detects danger, the device emits a flashing light to grab the attention of drivers. Additionally, the safety system emits a loud sound to the vehicle behind before a collision, helping to prevent it.


Open Datasets from Rear-view Cameras: Essential for Research, but Scarce Online
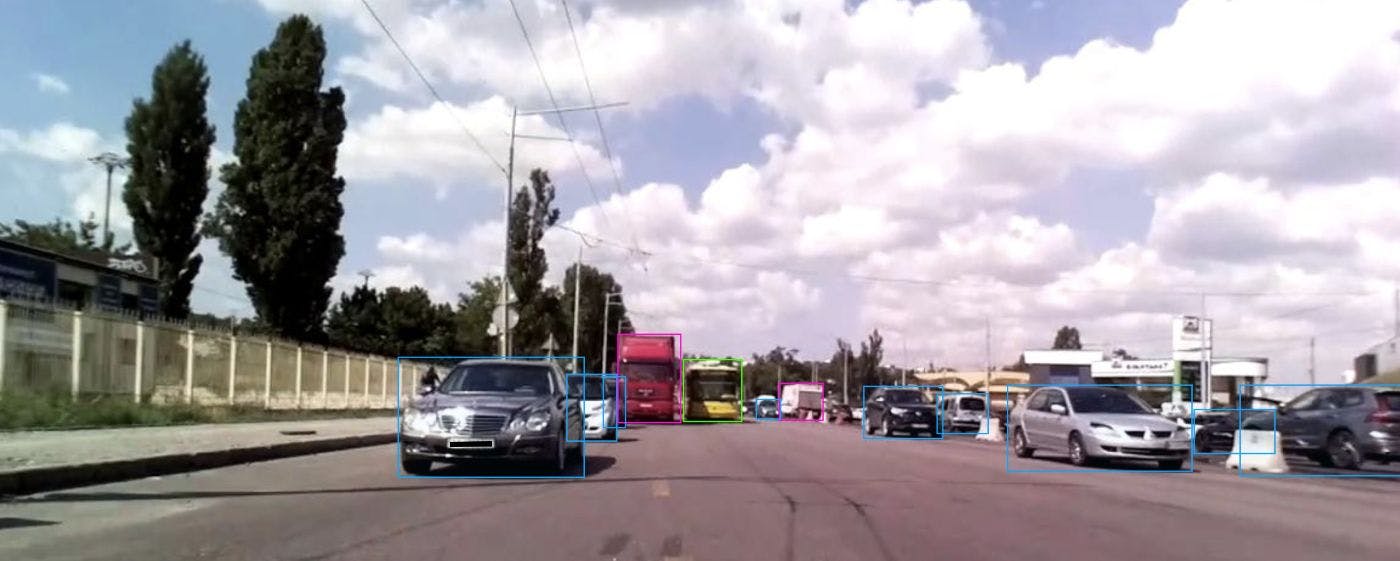
In order to train my object detection neural network (part of the computer vision algorithm, used for perception), I needed to find a large dataset of different scenarios from public roads captured by rear-view cameras. Unfortunately, such open-source datasets were not available on the web when I got started.
In its entirety studies of driving behavior are extremely useful in transportation engineering, serving various purposes such as data collection for statistical analysis, identification of driving models, and estimation of modeling parameters. The data and models can be applied in several areas, including road safety analysis, microscopic models for traffic simulation, forecasting, and control, and control logic for advanced driving assistance systems.
Running ahead, it should be said that while working on this project I've created the dataset from Ukrainian public roads captured by rear-view cameras of the first MVP users in 2021.
Totally understanding the public and social importance of having such datasets in the public domain, I’ve uploaded the results of my work here.

Let’s Talk Hardware: Rapid Prototyping with a Low Budget
To teach the neural network predicting accidents I had to collect a lot of data. For this case, I needed to develop camera prototypes to give to my first beta testers for recording their rides. Fortunately, my cycling community network includes a lot of safety road activists. The only thing left to do was to assemble a few devices to hand them to my first users.
Let me briefly describe the developing process and explain the logic of choosing specific technical solutions below.
The hardware configuration: the case was 3D-printed. Raspberry Pi 3B+ Computer module was chosen as the platform, and custom PCBs were made to keep the case compact and lightweight.


I used a standard Raspberry Pi IMX219 sensor for the camera, but I employed a 120-degree lens. High-powered LED lights and a red-tinted lens (also 3D-printed) were added for better visibility on the road.
I used the Google Coral Edge TPU (photos included), a low-cost and powerful 4 TOPs neural accelerator, for running neural networks on the device. The TPU was connected via USB.
All these electronics consumed 7-8W at maximum load (video recording, real-time neural network operation, and LED flashing). An 8Ah Li-ion battery (photographs of the inside of the casing included) was used to ensure 4-5 hours of operation.
Software Insides: under the hood of OTA
For the OS, I used the standard Raspbian since it is better supported and all of the drivers I needed were easily installed without any issues. The main code that I decided to write after booting the OS was in C++.
I don't recommend starting with this - for experimentation purposes, I do believe Python might be a better option for beginners. However, if you want to effectively and precisely control all of the limited resources on the Raspberry Pi with maximum hardware capabilities, it's worth writing in C/C++.
One of the most interesting solutions I made in this project is the OTA (over-the-air update) mechanism and the mechanism for collecting video recordings from devices.
The process looked like this: when a user finishes a ride and comes home, they insert a USB WiFi adapter, which connects to the home Wi-FI, and the device begins synchronization.
All videos were synchronized via Google Drive - I created a separate Google account for each device. Google Drive has a lot of advantages in my case: I was able to watch the videos instantly via the Google Drive web interface, it's easy to manually delete or add new files, and, last but not least, it was free for my experiments (up to 20GB for each account). (Google, please, don't be evil, there were only four MVPs at my newborn startup).
Using H.264 video encoding helps keep hundreds of videos on one Google Drive without running out of capacity.
Let me describe the OTA process: after compiling a new firmware, I upload it to a Google drive. The next time during synchronizing with Google Drive, a device downloads the newer firmware version and replaces the old one.
I used a simple gdrive utility for this. Here is the code that I use to upload a new firmware file:
gdrive upload -p “gdrive folder id” “file”
Below I give a line of code for loading new firmware on a device:
gdrive update “id” “file”
After checking the firmware version, the video synchronization happens and all new recordings upload to Google Drive.
This is how the videos download to the disk from a device:
gdrive sync upload “local folder” “gdrive folder id”
Once a day, I ran a script on my server to synchronize all Google Drives with my local folders and downloaded all new videos.
gdrive sync download “gdrive folder id” “local folder”
Thus, after several months of work, my devices have collected 200+ videos ready for labeling.
After collecting the video, I processed it, filtered it, and created the dataset. Then I gathered a small team for manual labeling. The team included 4 people who labeled every single photo.
Eventually, as was mentioned before, I gave the dataset to open source. You can find it via the link: GitHub link.
I do believe that open-sourced datasets are a valuable resource for the research community, and they can greatly contribute to the development of new algorithms and models in the field of road safety.

L O A D I N G
. . . comments & more!
. . . comments & more!