6,053 reads
Smoke and Mirrors in Pure UIKit
by Peter J.May 19th, 2023


Too Long; Didn't Read
UIKit is a powerful toolkit that, when used right, can create amazing visual effects. In this article, we'll dig deep into UIKit and showcase a technique to create a mirror-like reflection. This effect can give your app a visually impressive and engaging look that typically seems achievable only with complex graphical tools.
As app developers, we're not just coders – we're creators, builders, and sometimes, illusionists. The art of app development goes beyond just code and design. Sometimes, it's about crafting an element of surprise and illusion that captures users' attention and creates an immersive experience. This time around, we're stepping out of our comfort zone of the 2D world, and taking a bold leap into the captivating world of 3D.
UIKit is more than a set of tools for building user interfaces. It's a powerful toolkit that, when used right, can create amazing visual effects. In this article, we'll dig deep into UIKit and showcase a technique to create a mirror-like reflection. This effect can give your app a visually impressive and engaging look that typically seems achievable only with complex graphical tools, yet it's crafted with nothing but code.
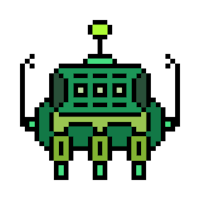
The end result
Check out this beautiful, shiny cube. It will never rust, as it doesn't use any Metal.


Now, let's learn how to create it using code.
Some basics first
For our purposes, UIKit serves as a slim layer atop Quartz Core, providing us with free access to its 3D capabilities. A UIView holds a reference to a CALayer object, which is the actual component the OS uses for on-screen rendering. There are three properties of CALayer that influence its on-screen presentation: position, bounds, and transform. The first two are fairly self-explanatory, while transform can be initialized with any arbitrary 4x4 matrix. When multiple 3D layers need to be presented simultaneously, we must employ a specialized CATransformLayer, which uniquely preserves the 3D space of its child layers instead of flattening them onto a 2D plane.
A cube
Let's begin by drawing a simple cube. First, we'll create a helper function to adjust the position of each side:
func setupFace(
    layer: CALayer,
    size: CGFloat,
    baseTransform: CATransform3D,
    translation: (x: CGFloat, y: CGFloat, z: CGFloat),
    rotation: (angle: CGFloat, x: CGFloat, y: CGFloat, z: CGFloat)
) {
    layer.bounds = CGRect(origin: CGPoint(), size: CGSize(width: size, height: size))

    var transform = baseTransform
    transform = CATransform3DTranslate(transform, translation.x, translation.y, translation.z)
    transform = CATransform3DRotate(transform, rotation.angle, rotation.x, rotation.y, rotation.z)
    layer.transform = transform
}
Next, in the body of our ViewController's viewDidLoad function, we will assemble all six sides of the cube:
let cubeLayer = CATransformLayer()
cubeLayer.position = CGPoint(x: view.bounds.midX, y: view.bounds.midY)
view.layer.addSublayer(cubeLayer)

let cubeSize: CGFloat = 200.0

var baseTransform = CATransform3DIdentity
baseTransform = CATransform3DRotate(baseTransform, 0.5, 0.0, 1.0, 0.0)
baseTransform = CATransform3DRotate(baseTransform, -0.5, 1.0, 0.0, 0.0)

let frontFace = CALayer()
frontFace.isDoubleSided = false
frontFace.backgroundColor = UIColor.blue.cgColor
setupFace(layer: frontFace, size: cubeSize, baseTransform: baseTransform, translation: (0.0, 0.0, cubeSize * 0.5), rotation: (0.0, 0.0, 1.0, 0.0))
cubeLayer.addSublayer(frontFace)

let backFace = CALayer()
backFace.isDoubleSided = false
backFace.backgroundColor = UIColor.red.cgColor
setupFace(layer: backFace, size: cubeSize, baseTransform: baseTransform, translation: (0.0, 0.0, -cubeSize * 0.5), rotation: (-.pi, 0.0, 1.0, 0.0))
cubeLayer.addSublayer(backFace)

let leftFace = CALayer()
leftFace.isDoubleSided = false
leftFace.backgroundColor = UIColor.green.cgColor
setupFace(layer: leftFace, size: cubeSize, baseTransform: baseTransform, translation: (-cubeSize * 0.5, 0.0, 0.0), rotation: (-.pi * 0.5, 0.0, 1.0, 0.0))
cubeLayer.addSublayer(leftFace)

let rightFace = CALayer()
rightFace.isDoubleSided = false
rightFace.backgroundColor = UIColor.yellow.cgColor
setupFace(layer: rightFace, size: cubeSize, baseTransform: baseTransform, translation: (cubeSize * 0.5, 0.0, 0.0), rotation: (.pi * 0.5, 0.0, 1.0, 0.0))
cubeLayer.addSublayer(rightFace)

let topFace = CALayer()
topFace.isDoubleSided = false
topFace.backgroundColor = UIColor.cyan.cgColor
setupFace(layer: topFace, size: cubeSize, baseTransform: baseTransform, translation: (0.0, -cubeSize * 0.5, 0.0), rotation: (.pi * 0.5, 1.0, 0.0, 0.0))
cubeLayer.addSublayer(topFace)

let bottomFace = CALayer()
bottomFace.isDoubleSided = false
bottomFace.backgroundColor = UIColor.gray.cgColor
setupFace(layer: bottomFace, size: cubeSize, baseTransform: baseTransform, translation: (0.0, cubeSize * 0.5, 0.0), rotation: (-.pi * 0.5, 1.0, 0.0, 0.0))
cubeLayer.addSublayer(bottomFace)
Here's what this code looks like in action:


It's undeniably 3D, but something feels off, doesn't it? The concept of 3D perspective in art was first mastered by Italian Renaissance painters in the 15th century. Fortunately, we can achieve a similar effect by just using a perspective projection matrix:
var baseTransform = CATransform3DIdentity
baseTransform.m34 = -1.0 / 400.0
baseTransform = CATransform3DRotate(baseTransform, 0.5, 0.0, 1.0, 0.0)
baseTransform = CATransform3DRotate(baseTransform, -0.5, 1.0, 0.0, 0.0)
Now let’s look at the result:


Better, isn’t it? The -1.0 / 400.0 term at m34 is what creates the perspective effect. For the actual math, see https://www.scratchapixel.com/lessons/3d-basic-rendering/perspective-and-orthographic-projection-matrix/building-basic-perspective-projection-matrix.html
Mapping the environment
Our goal is to demonstrate a mirror effect, so we'll need something to reflect. In 3D graphics, cube maps are commonly used to simulate reflective surfaces. In our example, we can create one using the actual cube we made earlier. First, we assign images to the corresponding faces:
frontFace.contents = UIImage(named: "front")?.cgImage
backFace.contents = UIImage(named: "back")?.cgImage
leftFace.contents = UIImage(named: "left")?.cgImage
rightFace.contents = UIImage(named: "right")?.cgImage
topFace.contents = UIImage(named: "up")?.cgImage
bottomFace.contents = UIImage(named: "down")?.cgImage
Next, for every face, we set isDoubleSided = true and increase the size of the cube to cubeSize: CGFloat = 2000.0. This essentially places the "camera" inside the cube:


Next, since we're going to create several cubes at once, let's simplify the setup functions:
enum CubeFace: CaseIterable {
    case front
    case back
    case left
    case right
    case top
    case bottom

    func translationAndRotation(size: CGFloat) -> (translation: (x: CGFloat, y: CGFloat, z: CGFloat), rotation: (angle: CGFloat, x: CGFloat, y: CGFloat, z: CGFloat)) {
        switch self {
        case .front:
            return ((0.0, 0.0, size * 0.5), (0.0, 0.0, 1.0, 0.0))
        case .back:
            return ((0.0, 0.0, -size * 0.5), (-.pi, 0.0, 1.0, 0.0))
        case .left:
            return ((-size * 0.5, 0.0, 0.0), (-.pi * 0.5, 0.0, 1.0, 0.0))
        case .right:
            return ((size * 0.5, 0.0, 0.0), (.pi * 0.5, 0.0, 1.0, 0.0))
        case .top:
            return ((0.0, -size * 0.5, 0.0), (.pi * 0.5, 1.0, 0.0, 0.0))
        case .bottom:
            return ((0.0, size * 0.5, 0.0), (-.pi * 0.5, 1.0, 0.0, 0.0))
        }
    }

    func texture() -> UIImage? {
        ...
    }

    func color() -> UIColor {
        ...
    }
}

func setupFace(
    layer: CALayer,
    size: CGFloat,
    baseTransform: CATransform3D,
    face: CubeFace,
    textured: Bool
) {
    layer.bounds = CGRect(origin: CGPoint(), size: CGSize(width: size, height: size))
    layer.isDoubleSided = textured

    let (translation, rotation) = face.translationAndRotation(size: size)
    var transform = baseTransform
    transform = CATransform3DTranslate(transform, translation.x, translation.y, translation.z)
    transform = CATransform3DRotate(transform, rotation.angle, rotation.x, rotation.y, rotation.z)
    layer.transform = transform

    if textured {
        layer.contents = face.texture()?.cgImage
    } else {
        layer.backgroundColor = face.color().cgColor
    }
}

func setupCube(
    view: UIView,
    size: CGFloat,
    textured: Bool,
    baseTransform: CATransform3D,
    faces: [CubeFace]
) -> CATransformLayer {
    let cubeLayer = CATransformLayer()
    cubeLayer.position = CGPoint(x: view.bounds.midX, y: view.bounds.midY)

    for face in faces {
        let faceLayer = CALayer()
        setupFace(layer: faceLayer, size: size, baseTransform: baseTransform, face: face, textured: textured)
        cubeLayer.addSublayer(faceLayer)
    }

    return cubeLayer
}
Now, let's render both the cube map and a small cube simultaneously:
var baseTransform = CATransform3DIdentity
baseTransform.m34 = -1.0 / 400.0
baseTransform = CATransform3DRotate(baseTransform, 0.5, 0.0, 1.0, 0.0)

view.layer.addSublayer(setupCube(view: view, size: 2000.0, textured: true, baseTransform: baseTransform))
view.layer.addSublayer(setupCube(view: view, size: 100.0, textured: false, baseTransform: baseTransform))


Reflections
UIKit is a robust framework, yet it lacks built-in features for complex visual effects. However, it does offer the ability to apply arbitrary masks to objects, and that's precisely what we're going to exploit to create the mirror effect. Essentially, we will render the environment six times, each masked by the corresponding cube face.
The tricky aspect is that we can't directly mask a CATransformLayer. However, we can circumvent this limitation by nesting it inside a CALayer container:
func setupReflectiveFace(
    view: UIView,
    size: CGFloat,
    baseTransform: CATransform3D,
    face: CubeFace
) -> CALayer {
    let maskLayer = CALayer()
    maskLayer.frame = view.bounds
    maskLayer.addSublayer(setupCube(view: view, size: size, textured: false, baseTransform: baseTransform, faces: [face]))

    let colorLayer = CALayer()
    colorLayer.frame = view.bounds
    colorLayer.mask = maskLayer
    colorLayer.addSublayer(setupCube(view: view, size: 2000.0, textured: true, baseTransform: baseTransform, faces: [.front, .back, .left, .right, .top, .bottom]))

    return colorLayer
}
And now, our viewDidLoad should look like this:
var baseTransform = CATransform3DIdentity
baseTransform.m34 = -1.0 / 400.0
baseTransform = CATransform3DRotate(baseTransform, 0.5, 0.0, 1.0, 0.0)

for face in CubeFace.allCases {
    view.layer.addSublayer(setupReflectiveFace(view: view, size: 100.0, baseTransform: baseTransform, face: face))
}


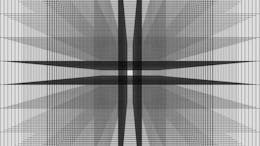
This image already closely resembles what we intended to achieve, but at this point, the cube is merely a 3D-esque mask over the cube map. So, how do we transform it into an actual mirror?
The Mirror Dimension
It turns out there's a straightforward method to mirror the world relative to an arbitrary plane in 3D space. Without delving into complex mathematics, this is the matrix we're seeking:
func mirrorMatrix(planePoint: Vector4D, planeTransform: CATransform3D, planeNormal: Vector4D) -> CATransform3D {
    let pt = applyTransform(transform: planeTransform, point: planePoint)

    let normalTransform = CATransform3DInvert(planeTransform).transposed
    let normal = applyTransform(transform: normalTransform, point: planeNormal).normalized()

    let a = normal.x
    let b = normal.y
    let c = normal.z
    let d = -(a * pt.x + b * pt.y + c * pt.z)

    return CATransform3D([
        1 - 2 * a * a, -2 * a * b, -2 * a * c, -2 * a * d,
        -2 * a * b, 1 - 2 * b * b, -2 * b * c, -2 * b * d,
        -2 * a * c, -2 * b * c, 1 - 2 * c * c, -2 * c * d,
        0.0, 0.0, 0.0, 1.0
    ]).transposed
}
Next, we incorporate the following code into the cube setup function:
func setupCube(
    view: UIView,
    size: CGFloat,
    textured: Bool,
    baseTransform: CATransform3D,
    faces: [CubeFace],
    mirrorFace: CubeFace? = nil
) -> CATransformLayer {
    ...
    if let mirrorFace {
        let mirrorPlane = mirrorFace.transform(size: size, baseTransform: baseTransform)
        let mirror = mirrorMatrix(planePoint: Vector4D(x: 0.0, y: 0.0, z: 0.0, w: 1.0), planeTransform: mirrorPlane, planeNormal: Vector4D(x: 0.0, y: 0.0, z: 1.0, w: 1.0))
        cubeLayer.sublayerTransform = mirror
    }
}
And finally, we can behold the shiny cube we've been striving for:


Why UIKit?
Sure, achieving the same effect might seem easier with Metal or a Metal-based framework like SceneKit. But those come with their own set of limits. The big one? You can't bring live UIKit views into the 3D content drawn by Metal.
The method we've looked at in this article lets us display all sorts of content in a 3D setting. This includes maps, videos, and interactive views. Plus, it can smoothly blend with any UIKit animations you might want to use.
The source code for this article, along with some helper functions, can be found at https://github.com/petertechstories/uikit-mirrors
Happy coding!

L O A D I N G
. . . comments & more!
. . . comments & more!